The sadness (and boredom) of this situation enticed us to apply our expertise in IoT software development and create a DIY IoT solution tailored to our specific needs and requirements. By DIY we don’t mean sitting three nights in a row with a soldering iron, sensors, and microcontrollers. No need to reinvent the wheel. We simply researched the market to find a suitable device and a nice platform, which didn’t make our experiment less challenging.
First thing’s first: the idea. Many IoT devices are meant to bring you comfort, and for anyone who spends long hours in front of their computers, comfort means the quality of air in the room, its humidity, and temperature since, obviously, all of them directly affect your performance. Briefly speaking, we needed some kind of weather monitor, and after a small research, we chose the Netatmo weather station.
The second thing we needed was a platform. Luckily, two major players had released their somewhat interlinked solutions apropos: Raspberry Pi Foundation introduced Raspberry Pi 2 B and Microsoft announced Microsoft Windows 10 IoT Core. This gave us a full-fledged device running on a member of the Windows 10 family (good news for C# and .NET lovers!), manageable via GPIO (General Purpose Input Output).
Architecture
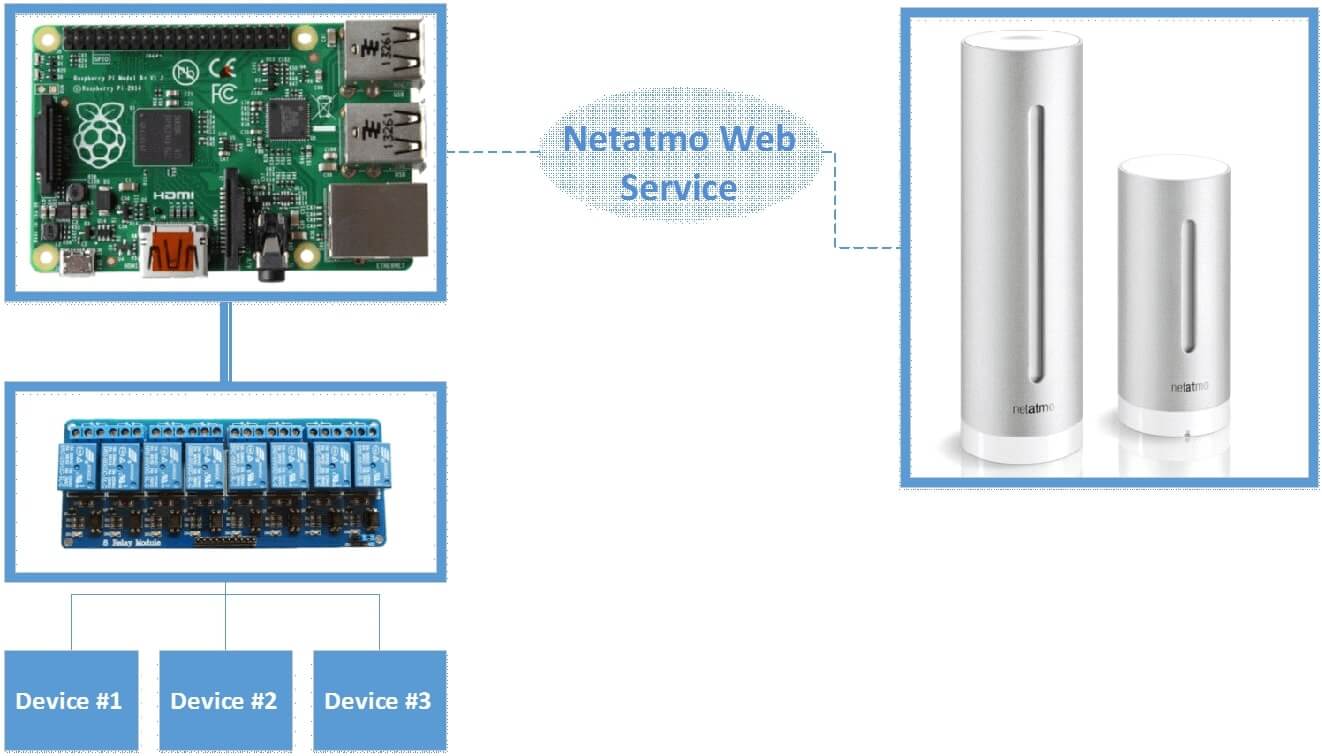
So, the hardware part of our experiment consists of Raspberry Pi 2 B, Netatmo Weather Monitor and an 8-channel relay module to manage load.
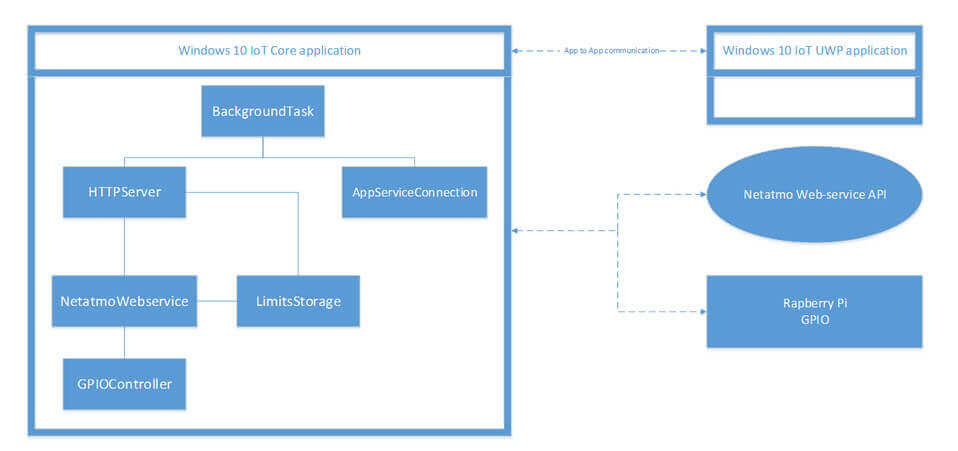
Our service application runs on Raspberry Pi in the background and uses GPIO to manage the relay module which commutates the necessary load. The service also occasionally communicates with the Netatmo web service to obtain the data it sends to the cloud to compare it with respective limit values set by the user. If the parameter exceeds the limit, the service switches the necessary device (air conditioners, supply ventilation, etc.) on or off. Users can change, add or remove any parameter via a web interface implemented through our own HTTP server. All rules and parameters are stored in a simple JSON file serializing or deserializing a model written as a list of rules. There are certainly more elegant or complex storages, but we think this simple solution pretty much matches the purpose.
The service we developed is launched by a simple Windows 10 universal app executed on Raspberry Pi and directly communicates with the app via AppServiceConnection. This allows us to change parameters and rules not only via web interface, but also via the app itself. It also enables receiving status reports and data from the monitoring device.
Why Windows 10 IoT
Windows 10 IoT gains popularity. Home equipment hubs, for instance, have already been built on Windows 10 IoT Core. Developers can now choose to use things developed on OSS and link to the cloud when necessary to process data or use familiar tools like Visual Studio or .NET and create universal applications.
We chose Windows 10 IoT for several reasons:
- The desire to write something for an unfamiliar environment for a change. We, engineers at ELEKS, are curious folks.
- C# and .NET Framework are our all-time favorites. And Windows 10 Universal Windows Platform (UWP) has its appeal, too.
- This environment allows us to control GPIO, I2C and UART with just a couple of lines of code.
There’s one more specialty to Windows 10 IoT: Microsoft recognizes the popularity of Arduino and will work hard to make Windows 10 devices compatible with it.
Smart House Controller
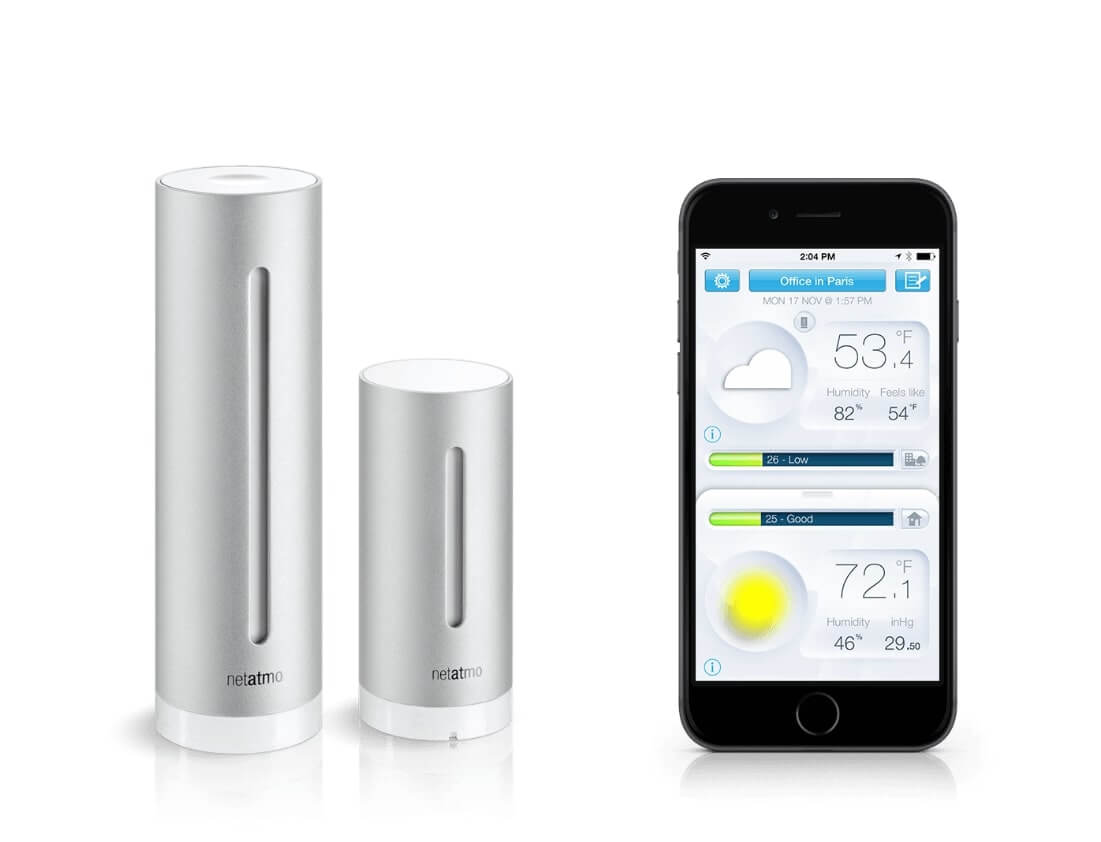
Netatmo looks like an ordinary yet stylish weather monitor checking its environment for temperature, humidity, carbon dioxide concentration, noise, etc. But this gadget has a huge potential in terms of building a really smart home around it – without wires or long hours of programming. That’s why we chose it for our experiment.
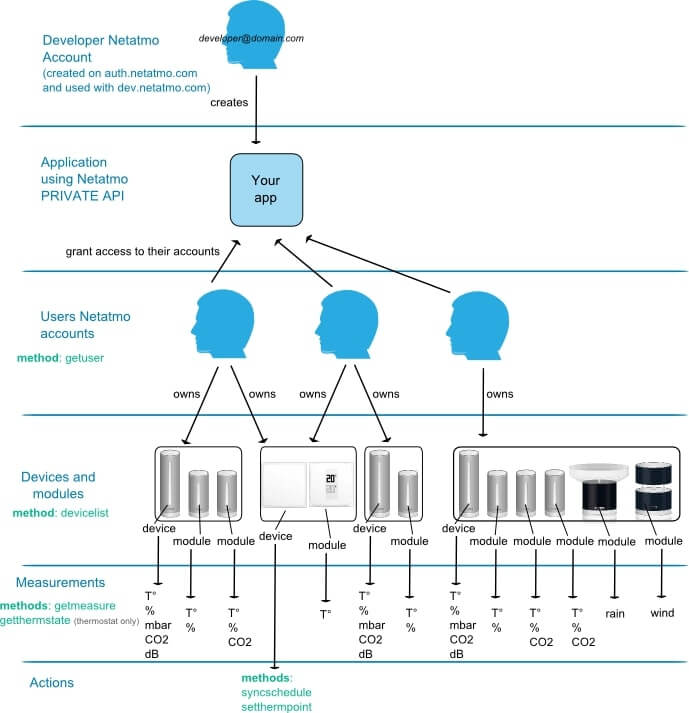
The monitor consists of two blocks: one for indoor and the other for outdoor use. Indoor measurements include temperature, humidity, pressure, noise, CO2 level; outdoors is measured for temperature and humidity.
From the technical point of view, Netetmo’s greatest benefit is that it communicates all gathered data to the cloud every five minutes; the data is then available both on the company’s website and via API.
Netatmo Web API
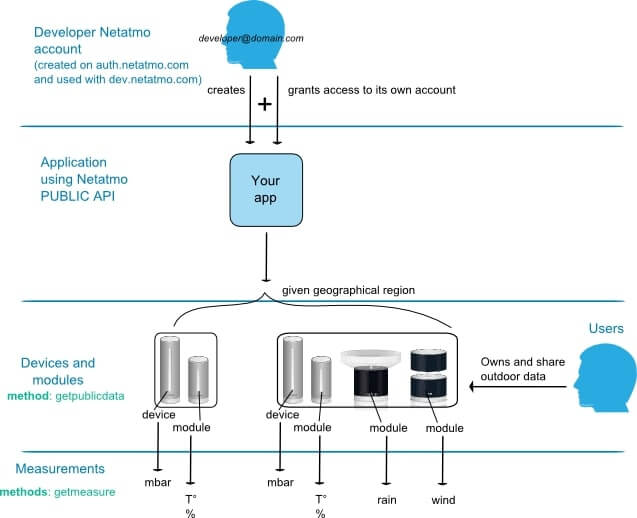
So, what does Netatmo web service offer to developers? First of all, it is the public API that allows gathering the following data from outside monitor modules in a set geographic region:
- Atmospheric pressure
- Temperature
- Humidity
- Precipitation
- Wind strength and direction
In other words, Netatmo provides enough data for mobile apps monitoring the weather in the region.
But the juiciest part of Netatmo’s API is its private API that gives us access to a particular weather monitoring device and all its data. The data include:
- Indoor temperature
- Indoor humidity
- CO2 concentration
- Indoor noise level
- Outdoor temperature
- Outdoor humidity
- Direction and strength of wind
- Precipitation level
While we’re interested mostly in the latest data from the monitor, the private API actually allows gathering data for specific time spans (30 minutes, 60 minutes, three hours, one day, you name it) and even apply filters.
Of course, the API has its limitations:
- Max number of stored measurements is 1024
- Number of queries is limited to 200 per 10 sec (for the app)
- Number of queries is limited to 2,000 per hour (for the app)
- Number of queries is limited to 50 per 10 sec (for one app user)
- Number of queries is limited to 500 per hour (for one app user)
Nevertheless, the monitor sends the data to the cloud every 5 minutes, which means there’s no point in making queries more often than that (which the manufacturer points out in the API manual).
GPIO Controller: Managing Multiple Devices Easily
Raspberry Pi has many advantages, but we found its ability to manage external devices the key feature for our experiment.
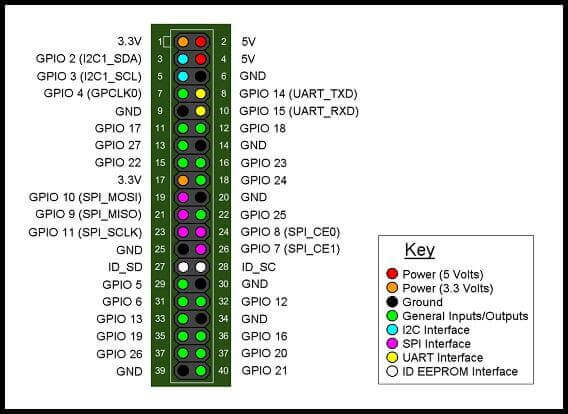
Raspberry Pi 2 B model features a 40-pin GPIO socket (previous models had 26 pins). No high hopes though: 12 pins are allocated to power supply, 2 to I2C interface, 5 to SPI interface, 2 to EEPROM – just 13 pins left for users, namely 4, 5, 6, 12, 13, 16, 18, 22, 23, 24, 25, 26 and 27.
In Windows 10 IoT, the GPIO outputs are managed by the GPIOController class available to C#, C++, JavaScript and Visual Basic developers. The class requires two methods:
- GetDefault() which returns the default GPIO controller (if any) for the system in question.
- OpenPin(Int32) or a safer one in terms of exclusion TryOpenPin(), both of which open a connection through a pin with a designated number.
After we open a connection with a pin, we can set its operation, read values from it or write them into a pin (logic zero or logic one).
Here’s an example of code to initialize and use a pin:
// Set number of pin that we want to open
int number = 4;
// Open connection to the pin GpioPin
pin = _gpioController.OpenPin(number);
pin.Write(GpioPinValue.High);
pin.SetDriveMode(GpioPinDriveMode.Output);
Why do we write the GpioPinValue.High value when initializing the pin, when in fact we would need GpioPinValue.Low to establish logic zero at the output? The reason is the next line where we set the DriveMode to Output. Here’s what MSDN has to say:
“When you setup drive mode to ‘GpioPinDriveMode.Output’ that configures the GPIO pin in strong drive mode, with low impedance.”
This means that the device connected to the pin will switch on when the output value is GpioPinValue.Low.
Later on, having saved the variable with an open pin, you’ll be able to change its value from closed to open and the other way with a single line.
And this is how with a class of 100 – 200 lines, you’ll be able to manage 13 devices. Not that impressive, but good for starters. And don’t forget that you have a spare I2C for 128 devices (theoretically).
Custom HTTP Server: The Great Test Solution Not to be Used in Real Life
Now let’s look at our custom HTTP server. To create one, we need a new project for IoT Core – a BackgroundTask where our web-server will be executed, along with the AppToApp communication service host for communicating with Windows UWP Application on Raspberry, where our BackgroundTask is actually registered and run. When creating a custom HTTP-server, it is very important to add the Package.appxmanifest parameter:
<Capabilities>
  <Capability Name="internetClient" />
  <Capability Name="internetClientServer" />
</Capabilities>
For AppToApp communication, we have to add the following extension to the file. The extension should feature a namespace and a class for BackgroundTask. The Name attribute in AppService should feature the communication service name.
<Extensions>
 <uap:Extension Category="windows.appService" EntryPoint="SmartHouse_Netatmo.IoTCore.StartupTask">
 <uap:AppService Name="App2AppComService" />
 </uap:Extension>
</Extensions>
To create the web-server, we need the StreamSocketListener that will listen to the designated port and subscribe to the event of ConnectionReceived which we’ll process when getting GET queries from the front end.
listener = new StreamSocketListener();
port = serverPort;
listener.ConnectionReceived += (s, e) => ProcessRequestAsync(e.Socket);
private async void ProcessRequestAsync(StreamSocket socket)
 {
 try
 {
 // this works for text only
 StringBuilder request = new StringBuilder();
 using (IInputStream input = socket.InputStream)
 {
 byte[] data = new byte[BufferSize];
 IBuffer buffer = data.AsBuffer();
 uint dataRead = BufferSize;
 while (dataRead == BufferSize)
 {
 await input.ReadAsync(buffer, BufferSize, InputStreamOptions.Partial);
 request.Append(Encoding.UTF8.GetString(data, 0, data.Length));
 dataRead = buffer.Length;
 }
 }

 using (IOutputStream output = socket.OutputStream)
 {
 string requestMethod = request.ToString().Split('\n')[0];
 string[] requestParts = requestMethod.Split(' ');

 if (requestParts[0] == "GET")
 await WriteResponseAsync(requestParts[1], output);
 else
 throw new InvalidDataException("HTTP method not supported: "
 + requestParts[0]);
 }
 }
 catch (Exception ex)
 {
 Debug.WriteLine(ex.Message);
 }

 }
Then we look at query parameters and manually write a reply into the OutputStream. Here comes the answer to the question, why not to use this approach in real life with real products? A small HTML+CSS+JS page with only a couple of functions generates over a dozen queries every time the page is reloaded. You’ll have to parse everything manually, create a response depending on a query and send it. We tried this approach just for the sake of proving the concept.
Thus, if you need a similar solution with a web service, try to wait for stable betas of ASP.NET MVC and DNX for ARM. You’ll have a range of options and real opportunities to make something much better than simply a concept.
Conclusion
So, what do we have? First, analytical research and a solid working prototype that works with other devices and manages them correctly. BTW, the hardware budget is less than $200, which is cheaper than any other similarly functional smart home solution. Second, we received a Proof of Concept for the software part of the experiment. The solution will last through upgrades, and there’s space for growth in terms of using ASP.NET 5 MVC as a web application & service and a universal app with GUI for data visualisation.
For developers, the experiment was a hands-on experience with Windows 10 IoT, the Netatmo’s web API and ARM apps. It also allowed working with real hardware and trying something new in general, namely creating a DIY solution for smart home written in the favorite language.
If you want to learn more about modern IoT solutions, we will be happy to discuss your needs. Contact our team of IoT experts.
Related Insights




The breadth of knowledge and understanding that ELEKS has within its walls allows us to leverage that expertise to make superior deliverables for our customers. When you work with ELEKS, you are working with the top 1% of the aptitude and engineering excellence of the whole country.

Right from the start, we really liked ELEKS’ commitment and engagement. They came to us with their best people to try to understand our context, our business idea, and developed the first prototype with us. They were very professional and very customer oriented. I think, without ELEKS it probably would not have been possible to have such a successful product in such a short period of time.

ELEKS has been involved in the development of a number of our consumer-facing websites and mobile applications that allow our customers to easily track their shipments, get the information they need as well as stay in touch with us. We’ve appreciated the level of ELEKS’ expertise, responsiveness and attention to details.

